clear all

Type

Gita's magazine
Video tutorials
Step by step DIY
Styling ideas
Learn new Technics
Most popular
Crystals inspiration
Color combinations
Technical questions

Jewelry

Necklace
Bracelet
Earring
Ring
Pendant
Hair Accessorie
Jewelry sets

Techniques

Embedding
Gluing
Beading
Other
Crimp Elements
Stringing

Materials

Cup chain
Stone setting
Metal embedding
Metal casting
Charms
Chains
Swarovski
Cabochons
Beads
Leather
Strings
Pearls
SW rhinestone

Skill level

Beginners
Intermediate
Advanced

Metal Plating

Antique Silver
Antique Silver
Antique Copper
Antique Copper
Antique Brass
Antique Brass
Shiny Silver
Shiny Silver
Gold
Gold
Nickel
Nickel
Rose Gold
Rose Gold
Black
Black
Bronze
Bronze
Noir Black
Misty Gold

Colors

Black
Black
Gray
Gray
White
White
Yellow
Yellow
Orange
Orange
Red
Red
Pink
Pink
Purple
Purple
Blue
Blue
Turquoise
Turquoise
Green
Green
Multi-color
Multi-color
Brown
Brown
Metallic
Metallic
Beige
Beige
Sparkly
Sparkly

Themes

Casual
Basic
Fancy
Bridal
Ethnic
Urban
Young
Vintage
Flowers
Winter
Spring
Summer
Autumn
Christmas
Valentin’s day
Mother’s day
Holidays
Religion
Evening

Crystal pendants hanging on a colorful cord

Crystal pendants hanging on a colorful cord

04/09/2016
Crystal pendants hanging on a colorful cord

Check out these super stylish jewelry pieces, that are so very easy to make. The best thing about them is that they really look great, even though they are made from a few stone settings, 3 or 4 crystals and a polyester cord.


They look beautiful, it doesn’t take long to make them and they will not be expensive to buy!


STEP 1: making the pendant
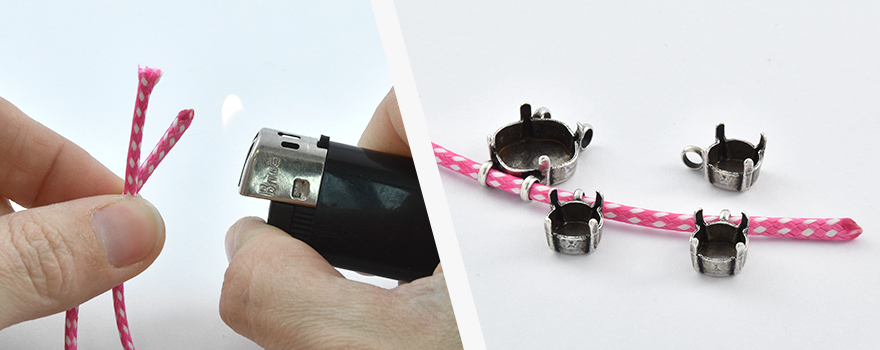
The edge of this braided cordage polyester cord can get untied, so use a lighter to gently worm the edge of the cord, and you will see that the threads melt and forms a strong tip that will help you slide it very easily inside the loops and will not open even when worn a lot.


Now you can easily slide the cord into the loops on the sides of these stone settings.


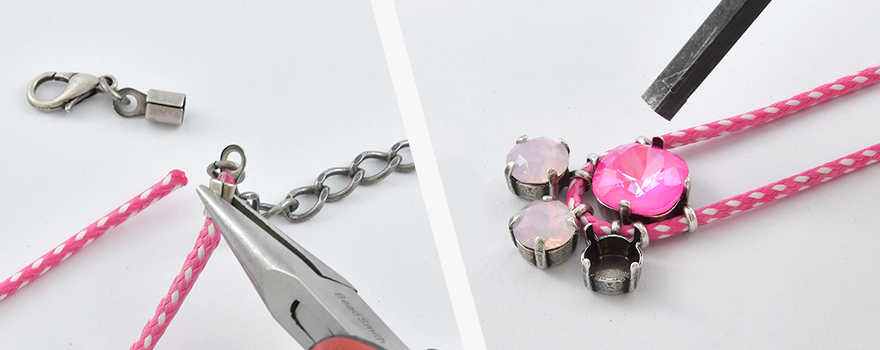
STEP 2: Closing and embedding
Use the plier tool to press the crimp ends tightly around the edges of the cord, connect the clasp on the right side, and the extension chain on the left side.


TIP: Most people are right handed, and it will be comfortable for them to hold the clasp on their right hand. That is the way we connect the clasp on the right side.


Now you can choose the crystal colors that you think is right for this necklace, and place the crystal inside the stone setting, and use the prong pusher to bend the metal prongs on the crystal, so it does not move.


STEP 3: Creating a bracelet
It is very easy to also make a bracelet in this way. Use two 17mm cords, and slide the 39ss\8mm stone settings on both of them. At one end side two 6mm jump rings, and one small 5mm jump ring that holds the two cords tightly together.


To finish of the bracelet, use a 3mm crimp end to hold both cords together, and connect clasp and extension chain on either sides.


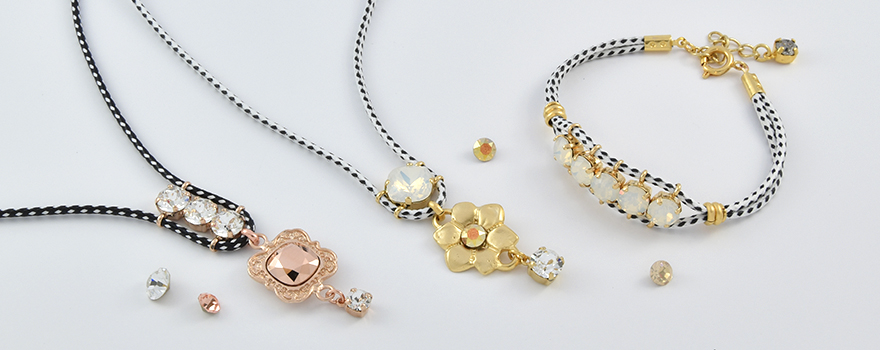
Have fun discovering new materials to make super stunning new jewelry!
GITA team.

Title
Plating/Rhinestone
Quantity
Price
Rose Gold (NF)
Rose Gold (NF)
Sale Expires:

1
$7.9
Antique Silver(NF)
Antique Silver(NF)
Sale Expires:

1
$4.4
39ss Stone setting with two side loops Price for 1 unit 5009048
Yellow Gold (NF)
Yellow Gold (NF)
Sale Expires:

1
$2.9
39ss stone setting with top loop Price for 1 unit 5001790
Antique Silver(NF)
Antique Silver(NF)
Sale Expires:

1
$2.9
Sale Expires:

1
$5.8

Related Tutorials:

Topaz and Lavender crystal set inspiration
Styling ideas
Introducing Swarovski’s NEW colors for spring summer of 2018
Be the first to see the five gorgeous new colors that Swarovski has launched for the upcoming spring...
Gita's magazine

Help us improve our school

Was the information Usefull? Yes No
Name:
Email Address:
Which other tutorials or articles would you like to see
Please note any suggestions for improvements for us to get better?

Please Wait

Succuess

Error Failed

0.729352